With warm weather and sunny skies, summer is the perfect time to embrace beachy vibes, and what better way to do that than through nail art? Nail art is a fun and creative way to express your personality while channeling the spirit of the beach. From vibrant colors to whimsical designs, there are endless possibilities for showcasing summer-inspired nail art. This comprehensive guide explores various beachy nail art designs that capture the essence of the ocean, along with tips and techniques to help you achieve stunning results. Get ready to make a splash with your manicured nails!
Beach-themed nail art has an irresistible charm that evokes feelings of relaxation and fun. Here are some reasons why ocean and beach-inspired designs resonate with so many during the summer months:
Beach-themed nail art often incorporates elements from nature—such as the ocean, sand, seashells, and palm trees—that remind us of the beauty of the outdoors. This connection to nature can bring a sense of peace and tranquility, making your nails an extension of your love for the seaside.
Summer is the season for vibrant colors! Beach-themed nail art typically features bright blues, sunny yellows, coral pinks, and lively greens. These colors evoke the feeling of a sun-soaked day by the water and can brighten up your overall look.
Beach-themed nail art offers a chance to get creative. With designs that include everything from seashells and starfish to waves and palm trees, there are endless opportunities to play with patterns and styles. Nail art can be as whimsical or sophisticated as you choose.
Nail art allows you to express your personality and interests. Whether you spend your summers lounging on the beach or prefer a vibrant pool party, you can create designs that reflect your summer adventures and style.
With platforms like Instagram and TikTok showcasing incredible nail art designs, summer also brings an influx of inspiration. Following nail artists and enthusiasts can provide ideas and tutorials for your next beach-themed manicure.
Before diving into the world of beachy nail art, it is essential to gather the right tools and products. Having the necessary items will help you create beautiful designs with ease.
Nail Polish: Invest in a range of colors that reflect beach vibes, including various blues, whites, soft pinks, and sandy beige. Don’t forget bright pops of color for accents.
Base Coat: A base coat is critical for nail health and acts as a foundation for your polish, preventing staining and ensuring longevity.
Top Coat: Apply a top coat for added shine and protection, enhancing the life of your nail art.
Nail Art Brushes: Fine-tipped nail art brushes will help you create intricate designs while wider brushes are suitable for base applications.
Dotting Tools: Dotting tools come in handy for creating dots and shapes, which can enhance your beach-themed designs.
Striping Tape: This thin tape is useful for creating clean lines and geometric designs, adding an extra layer of detail to your nails.
Makeup Sponges: Sponges are excellent for achieving gradient effects and blending colors seamlessly.
Nail Stamping Kits: Stamping plates provide an easy way to apply intricate designs without the need for advanced skills.
Tweezers: Use tweezers for placing small embellishments or gems on your nails.
Cotton Pads and Acetone: These are essential for cleanup and correcting mistakes during your nail art process.
Cuticle Oil: Regularly applying cuticle oil helps keep your cuticles hydrated and healthy.
Nail Polish Remover: Opt for acetone-free removers to ease the process of taking off polish without drying out your nails.
Nail File and Buffer: Maintain the shape of your nails with good quality files and buffers.
Proper nail prep is essential for ensuring beautiful and long-lasting nail art. Follow these steps to get your nails ready for beach-themed designs:
Begin by washing your hands thoroughly and removing any old nail polish. Make sure your nails are free from oils and debris.
Trim your nails to your desired length and shape and use a file to achieve smooth edges. Popular nail shapes include square, round, and almond.
Gently push back your cuticles using a cuticle pusher or an orangewood stick. This helps create a neat edge and allows for smoother polish application.
Lightly buff the surface of your nails using a buffer to create a smooth canvas for your designs. This step is crucial for enhancing polish adherence.
Finish the prep by applying a thin layer of base coat to protect your natural nails and allow the nail polish to adhere more effectively.
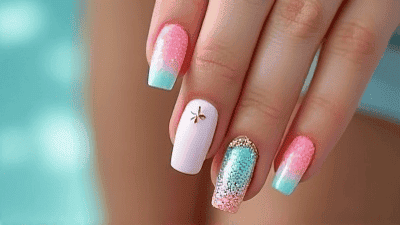
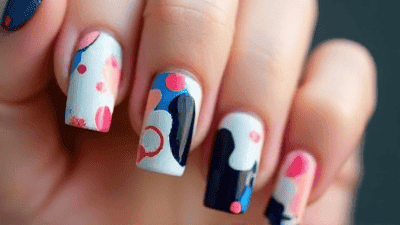
Here are some simple yet stunning beach-themed nail art designs to inspire your next manicure. Each design includes step-by-step instructions to help you achieve the look at home!
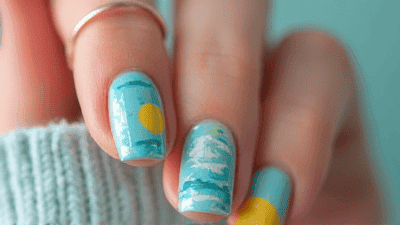
Capture the essence of the sea with ocean waves on your nails.
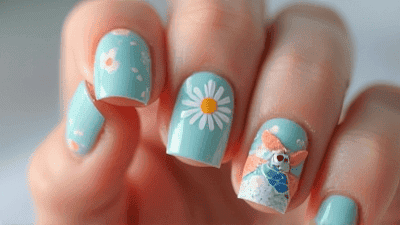
Seashells are a classic symbol of beach life, and they make for delightful nail art.
Bring a tropical vibe to your nails with palm trees.
A sunset by the beach is a breathtaking sight, and you can capture that beauty in your nail art.
Stripes are a classic nautical design that never goes out of style.
Dive into creativity with an under-the-sea theme featuring colorful fish and ocean creatures.
Mermaids inspire creativity with their enchanting scales, and this design can bring magic to your nails.
Create a stunning sunset beach silhouette that captures a beautiful evening by the shore.
As you embark on your nail art journey, challenges may arise. Here are some common issues and how to address them:
If your polish appears streaky or uneven, consider applying thinner coats rather than one thick layer. Allow each layer to dry completely before applying the next.
Bubbles often form due to shaking the polish bottle too vigorously. Instead, roll the bottle between your palms to mix the polish gently. Apply polish in thin layers for better results.
To avoid smudging, ensure that each layer is dry before moving on to the next step. Quick-dry top coats can help seal your designs quickly.
If tape pulls off polish during removal, make sure your base color is thoroughly dry before applying the tape. Consider using painter's tape for a gentler adhesion.
When cleaning up excess polish around the cuticles, use a small brush or Q-tip dipped in nail polish remover for precision. This will create a clean and polished look.
Engaging in nail art is an exciting way to express yourself, but it’s essential to maintain healthy nails to achieve the best results. Here are some tips to keep your nails in top condition:
Regularly wash your hands and keep your nails free from dirt and debris. Once you finish applying nail polish, remember to dry your nails thoroughly.
Use cuticle oil daily to prevent your cuticles from drying out. Healthy cuticles contribute to overall nail health and allow for smoother polish application.
Limit the use of harsh chemicals on your nails and hands. When cleaning, wear gloves to protect your nails from potential damage.
Allow your nails to breathe by taking breaks from nail polish and art occasionally. This prevents staining and keeps your nails strong.
A healthy diet rich in vitamins and minerals supports overall nail health. Incorporate protein, fruits, and vegetables into your meals for optimal results.
Beach-themed nail art is a wonderful way to capture the spirit of summer and showcase your personality. With endless design possibilities, vibrant colors, and fun themes, you can create unique nail art that reflects your love for the ocean and everything summery.
As you experiment with different styles and techniques, remember that practice makes perfect. Don’t be afraid to explore your creativity and have fun with your nail art. Whether you're gearing up for a beach day, a summer picnic, or simply want to bring a touch of the ocean to your daily life, these beachy nail art designs will help you make a splash.
So gather your tools, embrace the ocean vibes, and let your nails shine with beauty and summer spirit.